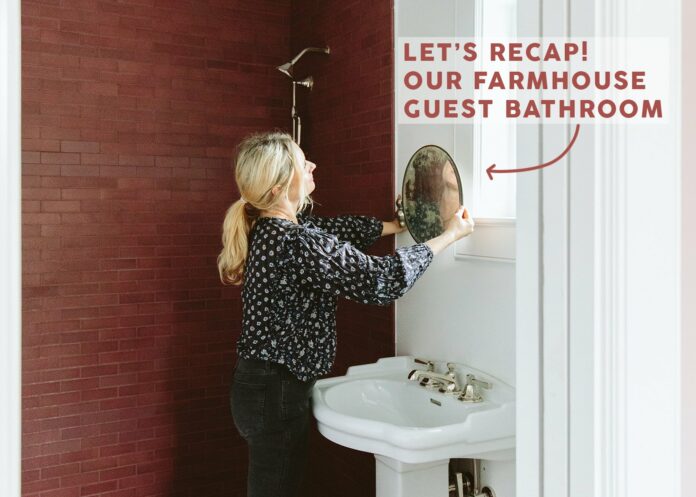

Wouldn’t you know it, but turns out the guest bath, the one that I’ve never really even used, is quite possibly my favorite now that it’s done. So today we are recapping where we are in the house because I’m sure a lot of you might not even remember and then I’ll hit you with the reveal (we JUST shot it). It turned out very different than the original vision but I love it so much.

As a reminder, this is the guest bath off the guest room upstairs. That floorplan is a bit weird because it’s showing you the downstairs footprint underneath the second floor so ignore all the kitchen, deck, TV room stuff – that is on the floor below. The point is, this bathroom didn’t exist and we weren’t going to do it, originally. But then some of you readers basically broke it down and said “Trust me, they’ll want separate bathrooms when they are teenagers” and while I know intellectually that kids don’t NEED their own bathrooms (and our kids are already so privileged that part of me wanted to deny them this luxury), we knew that it would be a good idea for the long term use of the home. It was a “do it now” and “when in Rome” situation and I’m very glad we did (so thank you).

To add this bathroom we had to steal from the guest bedroom and the closet, keeping the plumbing near the other bathroom. There was an awkward window in the bathroom that Anne (ARCIFORM) and I thought would actually be very cool and quirky to leave.

But as you can see the sink and toilet would be 1/2 in a window – rather awkward, but maybe awesome?

We knew that the only sink that could work was a pedestal or one with legs – essentially something that didn’t block the window completely like a more furniture-style vanity would. We would need something sculptural that could float for the most part. We partnered with Rejuvenation on all the plumbing and lighting in this home and I was so happy that they had a pedestal sink with an integrated tiny backsplash that could work. GREAT. So ARCIFORM drew it all up and we were almost done with it.

But then we realized that the back of the house would be so much prettier if we had a fourth matching vintage window to help it look balanced and symmetrical (especially with the wrap-around back porch feeling that we added underneath).

So we stole that guest bedroom window and installed it on this side of the house (after the window was fully restored thanks to Jamie and his team of magical carpenters). So that left the bathroom with no window. We could have done a new window, obviously, but our vintage windows were just so pretty and we had two left from the downstairs that needed a home. These were the two from the original entry.

These really only operate if they are together, but we figured that using one and making it inoperable would be totally fine in here.
But there wasn’t a clear solution for where it should go. It couldn’t go directly above the toilet because the roofline from the vaulted kitchen below was right there.

The size of it didn’t really lend itself to being directly above the pedestal sink either – it would be off-center but in a less intentional way (or so I feared). And technically we could now put a normal vanity with storage there since the window was going to be smaller, but this pedestal sink had already arrived and I didn’t want to change the design. So we went with the “good enough” option and decided to center the window between the vanity and the toilet and that a pretty window is better than no window (and at this point, it was too late to put in a skylight).


I suppose we could have shifted it a bit to the right or left, but honestly, this was a last-minute change and we didn’t want to have to reframe too much or move the wiring for the sconce so I think we just put it centered under the sconce in hopes that the three major pieces (sink, toilet, window) would feel balanced. I’m SO GLAD WE DID.

So this was how this bathroom was for like 9 months. Pretty boring, but totally usable/functional.

As a reminder we had chosen a grout color that matched the tile – a choice that was so easy and fast because I was extremely confident about it. What I didn’t realize was that this shower didn’t get enough natural light to do this move and that by doing so we lost some of the definition of the tile. I was only kinda bummed – at this point, I knew that it would be fine, so I just put it on the bottom of the list of things to think about and moved along. I also really still loved the color so it wasn’t this huge regret, just a “need to make it slightly better”.
We ended up trying a grout paint pen in a corner and boy did it look like garbage so I immediately wiped it off. Our grout spacing is 1/16th and too small of a line to use any sort of grout paint without it bleeding everywhere and looking so messy.


We added the glass glass door a few months ago so the kids could actually use it (and they do when they both shower). I made it taller than usual (which cost more) because the standard height felt too short. I added a U channel around it in polished nicked (it might be chrome, not sure) to give it a slightly more vintage and yet finished look which I love. We added a little knob instead of a huge handle which is just a style preference (we did this at my brother’s house, too so can def be used in a more contemporary way). The glass panel on the right is stationary and the door on the left swings both in and out, with the faucet handle being easy to turn on/off without getting wet. We made the door smaller which I was nervous wouldn’t look intentional, but like many things in the design process, your eye doesn’t really notice or even clock it once the room is finished.

We went polished nickel in here because the pink was so warm, so I thought that the cooler tones of the silver finish would be a pretty contrast (and it is SO PRETTY). So as I was adding accessories I stuck in that world (I really like mixing metals, but once I knew that we were adding wallpaper I played it safer and kept it all polished nickel).

But What Wallpaper Did We Choose????

I thought we were going to go with this wallpaper for the longest time, but as the house kept evolving and I was adding more and more and more in the rooms (and loving this) I decided to step it up a bit. So you’ll have to come back and see the reveal tomorrow. Y’all I LOVE IT SO MUCH.
*Pretty Photos by Kaitlin Green
The post The Farmhouse Guest Bathroom Recap (+ The Biggest Challenges) appeared first on Emily Henderson.
stylebyemilyhenderson.com


