[ad_1]


It’s been a month since the loft reveal and I’m so happy to be back on here sharing another fun project with you all – my Thanksgiving tablescape! I can’t believe it’s already the holiday season… probably because it’s still 80 degrees in LA.
As an interior stylist / aspiring interior designer the holidays are the perfect opportunity to flex my creative muscles by decorating for gatherings!
This year is my partner, Jordan’s, and my first time hosting Thanksgiving dinner and honestly, I’m more focused on decorating the tablescape than cooking the actual food. Any tips on how to cook a turkey… asking for a friend.

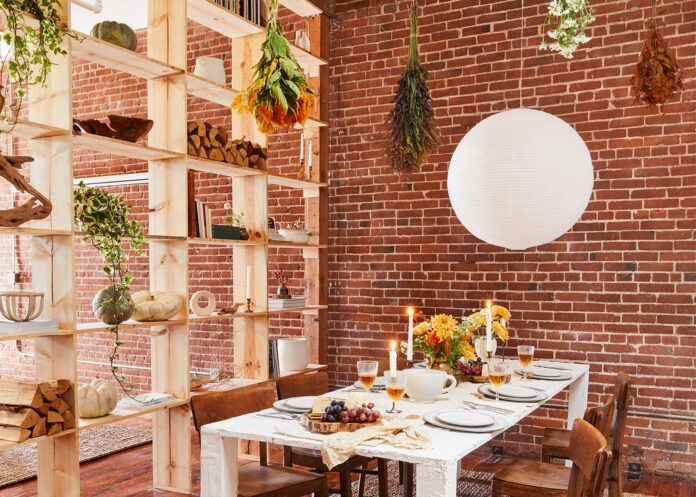
For the tablescape, I wanted to go outside of the box and attempt some DIY’s like building a plaster dining table from scratch. My vision for the tablescape was to include both vintage and new, neutral and colorful. I love the holiday’s but I’m not one to put decorative turkeys or “Thankful” signs everywhere. (Not that those decorations aren’t cute – just not my vibe) So, I embraced the challenge to create a holiday tablescape without the obvious Thanksgiving decor. Now, let’s dive into the DIYs:
DIY Plaster Dining Table
I’ve always wanted to build my own table. Since we have a round table that sits 4 and we’re having family over, we knew we needed a table that could sit everyone. Instead of buying a fold-out table or renting one, I figured if I’m gonna build a table it’s now or never.
I decided to make a white plaster table to brighten up the space and because I love the texture of plaster. I even decided to turn our “bedroom” into a dining room for the time being. A perk of living in a loft is having enough space to rearrange freely.

Now, I’m not gonna lie, this DIY was the most difficult. I am no carpenter. Last year, I attempted to make Jordan a bench and when he picked it up it fell apart.
“What did you use to secure it?” Jordan asked. I laughed and said, “Gorilla Glue.” Clearly, not my finest DIY moment.
Anyways, this time around I got myself a screw gun and REAL screws. Look at me now! I got all the supplies (lumbar, screws, and plaster) from Home Depot for $150! I told them my cut list and they even cut the pieces for me. For measurements, I just googled “average table height” and that’s how I came up with my cut list. The table length is 8 feet long and the legs are 30’’ tall.
I used a screw gun and screwed the legs into the surface of the table. Since I was covering the table with plaster, I decided it would be easier to screw the screws from the top. Once I had it all built, I applied the plaster. I used Plaster of Paris – all you need is to add water, mix, then apply. Make sure you don’t add too much water otherwise you won’t get a thick enough consistency. It’s definitely the messiest part of this DIY, so make sure you set down a tarp. I used a plaster knife to smooth/shape the plaster how I wanted. The plaster dries pretty fast so after about an hour or two of drying I painted it white to brighten it up.
Sidenote: If you decide to make a plaster table make sure you apply a sealer after, otherwise the plaster will chip and fall right off.
DIY Hanging Flowers
This is easy and so affordable! I went to the LA flower market and got all different types of flowers. I tied bouquets with twine then hung them from the ceiling above the table. I wanted to create a mini “floral art installation.” This was my favorite part of the decorating process. I decided to do different bouquets with the same flowers to create more contrast but also have variety.
DIY Table Flower Arrangements

As I mentioned earlier, I wanted to experiment with new and vintage, neutral, and bold colors. Since I decided to do a white table with neutral plates, napkins (vintage), and runner I wanted the flowers to be bold and bright.

Flower Styling Tip: Choose a color story, select different-sized flowers, mix some of them together and have a few single-flower arrangements that look sculptural.
DIY Name Cards

I went to a local thrift shop and bought vintage glassware for under $15, then I tied name tags I stamped around the wineglass. This was easy and so cute. I also scored vintage linen napkins for 50c. Lucky day!
Glassware Styling Tip: If you don’t have cider for your Thanksgiving photoshoot, use whiskey and Coors Light. It works every time 
DIY Charcuterie Board

I bought wooden charcuterie boards from Crate & Barrel that were the perfect touch for my neutral and bold, vintage, and new theme I had going. A tip for charcuterie – throw an herb on the plate to add some texture/color. I usually do rosemary or thyme.
Other Tablescape Styling Tips
- Don’t be afraid to mix silver AND gold
- Play with vintage and new
- It doesn’t have to be matchy-matchy
- Tapered candles are moody and fun
- Multiple vases with different heights add dimension
- Forage! Some of my favorite decorative accents are things I found on the street or on a hike. Get outside!

Dress
I hope you all have a wonderful holiday season surrounded by people you love.
Stay safe and healthy!
Cheers,
Bronte
*Design and Styled by Bronte Athearn
** Photos by Veronica Crawford
The post The Budget-Friendly, DIY Thanksgiving Tablescape We Are All Stealing Ideas From (I Mean, Look At It!) appeared first on Emily Henderson.
[ad_2]
stylebyemilyhenderson.com


