Renovation Diaries: Inside Art Director Annie Portelli’s Bathroom Transformation
Interiors


The Design Files art director Annie Portelli in her Newport home. Custom shelves by Gordon Johnson. Walls painted Dulux Hog Bristle Half.

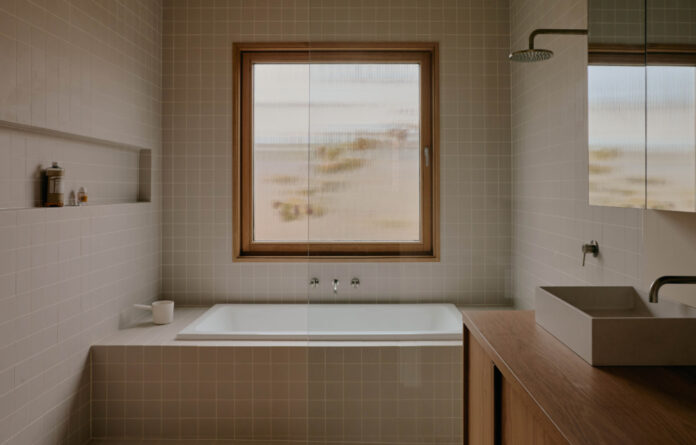
Meek Rectangle Basin by Concrete Collective. Brushed Nickel Tapware by Yabby. Cabinetry by Softer Studio.

Tilt and Turn Window by BINQ. Unglazed Mosaic Square Tiles from Academy Tiles.

Decina Carina Island Bath from Tradelink. Custom glass shower screen by Melbourne Glass Company. American oak timber floors from Provincial Floors.

Floor-to-ceiling tiles feature only the ‘wet’ areas of the bathroom.

Annie and Simon did all the carpentry in their house themselves, including creating this niche in the wall.

The mirror behind the vanity hides more storage space. Vase by Hattie Molloy.

Under the sink cleverly hides a laundry basket and washer/dryer, in lieu of a separate laundry!

The evolution of the serene bathroom!
How much does renovating a bathroom really cost?
Talking about budget can be a bit taboo when it comes to building, architecture, and design, but it’s no secret that managing your finances is one of the biggest challenges that comes with renovating.
Just ask TDF art director Annie Portelli and apprentice carpenter Simon Harris. Renovating their Newport home has been an all-consuming labour of love, after they stripped the property back to its bones and rebuilt it, as Annie revealed last year on our podcast TDF Talks.
They’re still working their way through the house putting on the finishing touches room by room. And despite designing and renovating most of the property themselves in a bid to keep costs down, their recently completed bathroom still wound up costing them more than $21,000.
‘Although it may be the smallest room in our house, it currently holds first place for the most expensive room in our house — but we haven’t done the kitchen yet,’ Annie says.
Below, she shares her biggest pieces of advice for renovating a bathroom, including a cost breakdown to help give you some insight on how to budget for your own projects!
Decide what areas to tile with the budget in mind
‘We decided to only tile the “wet” area of the bathroom both for the aesthetic appeal, but also for budget. The tiles go floor-to-ceiling in the back/wet half of the room, while in the front half, we have waterproof plaster walls, teamed with American oak flooring. We loved the idea of having floorboards in the bathroom as it connects so seamlessly with the rest of the house.
Timber flooring in the bathroom is not for everyone, and it wasn’t recommended by our flooring suppliers, so I will admit it is not the most practical choice in terms of durability as timber does not like to be wet. So if you are after a more durable approach, then you should definitely invest in having a fully tiled bathroom — or perhaps don’t tile all the way up to the ceiling, and leave the last quarter plastered. Only tiling half the bathroom did bring down tiling costs for us in terms of materials and trades.’
Bigger tiles = less labor, and less money
‘Something to keep in mind is that most tilers will charge their labour by the square meter of area that needs tiling. From what I’ve learned, it’s much easier to get a tiler on board if you have larger tiles! Big tiles makes their job less time-consuming, especially if you’ve got a lot of surfaces to cover, and walls that are not quite plumb. We didn’t really follow this rule ourselves because we’re suckers for punishment!’
Keep your plumbing in place
‘A piece of advice that I regrettably did not take on myself, is keeping your plumbing in place! Moving your plumbing around comes with trade and material costs, especially when it comes to reinstalling everything back in — including plaster, tiles, new pipework. If you can avoid moving your plumbing around this can save hundreds, if not thousands of dollars. Working with your existing bathroom floorplan will speed up the process too, it just means you will be embarking on a superficial face-lift, rather than a full-blown renovation.’
Avoid using unglazed tiles!
‘This one is my biggest regret! Although I adore the look of the tiles we chose, they are SO porous and extremely hard to keep clean. They show up every little speck of dirt. We find ourselves having to clean our feet before walking into the shower which is just… ridiculous. If we could do it all again, I would choose a tile with a satin or semi-gloss finish that has a slight grain or texture to it to hide the marks. If you take only one piece of advice from this article, let this be it!’
The importance of natural light
‘A big prerequisite of this bathroom design was that it had to be light, bright, and airy. My old apartment had a very dark bathroom and a window that only opened up about three centimetres — onto a walk-way. Not ideal! So the ability to have a giant window that opens right out to a (soon to be) luscious garden was my absolute dream!
There was already a window in this spot in the original layout but we replaced it with this big beautiful, fluted tilt-swing window and honestly, it’s the hero of the entire bathroom, and she is worth every dollar of the $2000 we spent. We have it on the ‘tilt’ function every single day. This means that you can have a shower, or bath while the sun beams in, and having a big open window is also great for ventilation, and light.’
Be smart with your storage solutions
‘Our house doesn’t have space for a laundry, so we decided to pop the washer/dryer under the bathroom vanity. This is an ideal solution for smaller houses like ours. It keeps the washer hidden away and it’s also quite effective at soundproofing the washer when it’s on thanks to the cabinetry. In the drawer beside the washing machine, we have a pull-out wash basket for our dirty clothes which I LOVE.
Having both your washing machine and basket tucked away under your vanity does eat up a lot of your storage space, which is why we decided to create some storage behind the mirrors. We keep everything in there; toiletries, cleaning products, washing products, toilet paper, it is amazing how much stuff you can get behind those mirrors!’
Final word
‘Collecting the numbers, I was shocked at how much of our budget was absorbed into this one little room! Although Simon and I DIY’d as much as we could to save money across the board, there are some things you just can’t do yourself — especially in the bathroom. Note: some things were generously gifted to us, so these aren’t included in the final cost. Same with carpentry (straightening the walls, building the bath hob and niche) since we did this ourselves, but I estimate it would’ve cost another $3000-$5000. So before you start thinking about renovating your bathroom, just know that it will cost you more than you might think!’
Budget breakdown
Tiles: $1807
Tapware: $859
Cabinetry: $3632
Sink: $1000 (gifted)
Toilet: $709
Bathtub: $564
Double-glazed window: $2000
Timber to build bath hob: $600
Insulation: $500
Custom showerscreen: $1163
Flooring: $1000
Plaster: $1500
Paint: $200-$300 (gifted)
Total materials cost: $14,334
Plumber: $1600
Painter: $500
Electrician: $650
Tiler: $4000
Total trade cost: $6,750
Overall total: $21,085
thedesignfiles.wpenginepowered.com


