[ad_1]
How To Upcycle A Timber Cabinet Into A Luxe Home Bar
How To

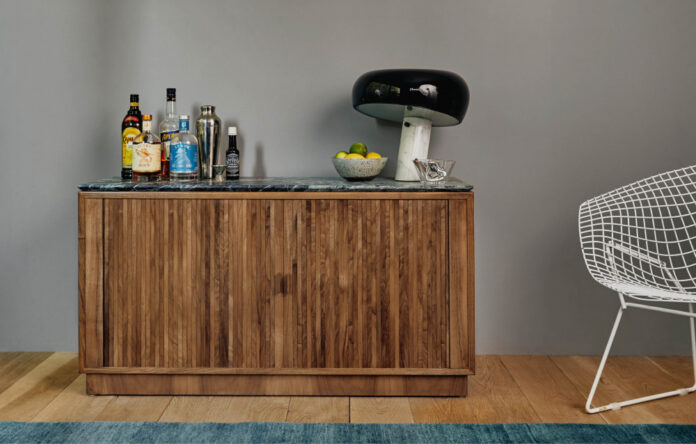
Our upcycled bar cabinet with all the trimmings! Photo – Amelia Stanwix

With its aged, orange-y varnish and scuffed top, this mid-century walnut cabinet had seen better days! Photo – Amelia Stanwix
When Feast Watson tasked me with revamping a piece of secondhand timber furniture, I honestly didn’t know if it was possible! While I’ve bought many vintage furniture pieces over the years, I’ve previously called on professionals to have them restored… little did I know the process could be quite this easy!
Armed with Feast Watson’s Scandinavian Oil, I bought a walnut cabinet for $400 in need of some TLC and brought it back to life. This clear product is a penetrating oil, so unlike a cosmetic varnish, it really sinks into the timber, and leaves an elegant satin finish.
Inside the cabinet, I went with Feast Watson’s Prooftint in Black Japan, which is a rich, dark timber stain that provides a great contrast with the walnut exterior.
Feeling inspired, I decided to go the extra mile by sourcing a piece of green marble, and having it cut to size, creating a fancy stone surface for my bar cabinet. This step is totally optional, but I must say I’m pretty impressed with the end results!

Sanding the cabinet with an orbital sander. Photo – Amelia Stanwix

Sanding the cabinet with an orbital sander — it took a few hours! Photo – Amelia Stanwix
Step one
First things first, I removed the doors and internal shelves, and sanded the entire cabinet inside and out using an electric orbital (i.e. circular) sander. This process took a good 2-3 hours, and a fair bit of elbow grease!
Keep the sander moving the whole time — don’t hold it still in one place for too long, or you may end up with uneven sanding across the cabinet.
After sanding the cabinet, wipe it down throughly with a soft rag to remove any residual dust before you apply your oil or varnish.

Applying the Feast Watson Scandinavian Oil with a rag. Photo – Amelia Stanwix

Apply the Scandinavian Oil to the exterior of the cabinet. Photo – Amelia Stanwix
Step Two
It’s already time to oil the cabinet. I selected Feast Watson’s Scandinavian Oil because it’s a natural oil product, not a synthetic varnish. This means it really soaks into the grain to nourish and protect the timber, rather than simply sitting on the surface. It also has a beautiful satin finish.
Apply the Scandinavian Oil using a clean rag, and wipe it on to the cabinet — first using a circular motion, and then wiping it back in the direction of the timber grain. It’s a fairly easy application process, but the main thing to remember is to keep moving your rag the whole time, you don’t want to allow the oil to pool or set in any one area.
For best results, apply two coats of the Scandinavian Oil, allowing 24 hours drying time in between each coat.

Sanding the tambour doors. Photo – Amelia Stanwix

Apply the Scandinavian Oil to the tambour doors. Photo – Amelia Stanwix
Step 3
One of the first things that drew me to this cabinet was its original tambour doors. These slatted timber doors are a sweet mid-century design detail that instantly inspired the idea of turning this cabinet into a home bar!
Luckily, we found a way to remove these doors so we could sand and stain them separately. (They sit in a channel that carries them from the front right around to the back of the cabinet, so by removing a back panel in the cabinet, we were able to slide the doors out at the back.)
I sanded the doors using an orbital sander again. Separately, I went over the edges of each timber slat by hand using sandpaper, just to ensure all the edges were sanded.
Once sanded, I applied the Scandinavian Oil to the tambour doors using a rag, as before.

Applying Feast Watson’s Prooftint in Black Japan to the shelves. Photo – Amelia Stanwix

We inserted a piece of mirrored acrylic into the back of the cabinet, to reflect the glasses and bottles and give our home bar a luxe feel. Photo – Amelia Stanwix
Step Four
Inside the cabinet, unfortunately the internal shelves were not a high quality walnut timber like the exterior. For this reason I decided to stain the interior of the cabinet black, providing a sense of contrast with the exterior, and also disguising the slightly different timber used for the internal shelves.
I chose Feast Watson’s Prooftint in Black Japan, and applied it to the shelves and internal walls of the cabinet using a paintbrush. It’s quite a rich, dark timber stain, so it’s a good idea to wear plastic gloves and clean up your brushes afterwards using turps.
Once the stain had dried (24 hours), I applied one coat of Scandinavian Oil over the top, using a rag as before, to seal and protect the shelves.
Step Five
I decided to give the interior of the cabinet a bit more of a luxe edge by inserting a piece of 3mm mirrored acrylic into the back of the cabinet (glued in place with Liquid Nails). This surface will reflect the glasses and bottles that I plan to display inside.

Replacing the stained internal shelves. Photo – Amelia Stanwix

Replacing the newly finished tambour doors. Photo – Amelia Stanwix
Step Six
After staining and sealing the internal shelves, I replaced them. (The mirrored acrylic now sits behind them inside the cabinet.)
Step Seven
After all the internal shelves were reinstated, and the oil dry on the cabinet exterior and doors, I replaced the newly oiled tambour doors.

With a little help from Gordy (and a couple of excellent stonemasons!) we added a custom-cut and honed piece of green acrylic to the top of our home bar. Photo – Amelia Stanwix
Step Eight
To really elevate our home bar, I decided to make it extra fancy by adding a custom-cut marble top.
I sourced a piece of green marble, and had it cut to size and honed by a stonemason, giving it a satin (not too shiny) finish. I must admit this did add a lot more expense to the project — the marble was $500, but the stonemasonry was another $500 — so all up the marble top costed an additional $1000. Was it worth it? I think so! But of course this step is optional.

Voila! The finished cabinet. Styled at home with Lucy’s favourite Flos Snoopy Table Lamp, and various bar accoutrements. Agra rug in Kingfisher from Armadillo. Photo – Amelia Stanwix

Inside the home bar, our internal shelf is the perfect height for bottles and glassware. Photo – Amelia Stanwix
And there you have it! Our upcycled, luxe home bar is complete. We’ve styled it with a lamp, cocktail shaker and accessories, and a range of fancy glassware and cocktail components inside.
You can see how the mirrored back inside the cabinet reflects the shimmering glassware stored inside — the perfect finishing touch!
Feast Watsonʼs annual ReLove project, now in its eighth year, is all about inspiring Australians to breathe new life into timber furniture, by making something that was once tired or outdated new again!
Feast Watson has a broad range of beautiful stains and varnishes to help bring any home design style to life. Head to Feast Watson’s website for details on their annual upcycling competition.
[ad_2]
thedesignfiles.net


