[ad_1]
Treating your stairs, hall and landing to a completely new look can be a fair bit of work, but for us it’s the brick-effect wallpaper that sets this hallway makeover apart. Having been painted in bright colours originally, the homeowner was keen to change the space to suit her evolving tastes – and that included a big revamp of the entire area.
If you’re looking for some DIY staircase ideas inspiration then read on to find out Hayley of @diyingtoupcycle managed her makeover, with incredible results.
Exposed brick hallway makeover

Image credit: @diyingtoupcycle
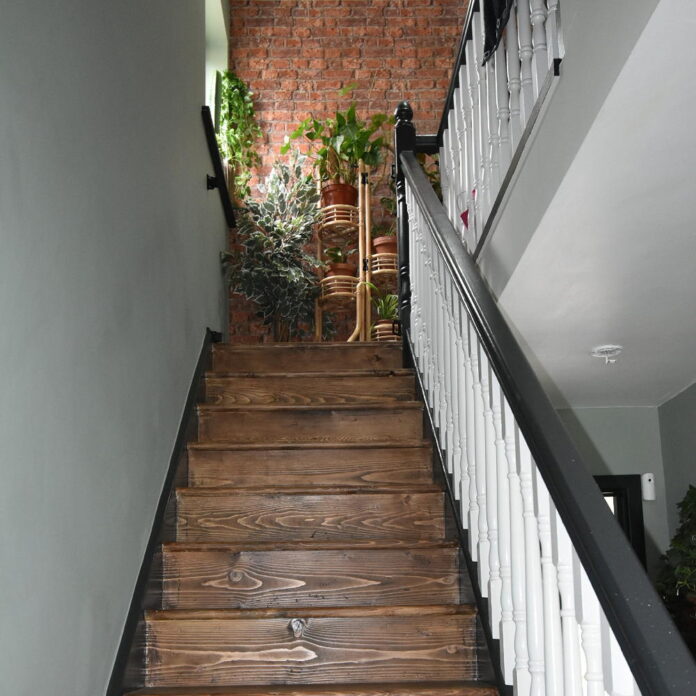
This monochrome-coloured staircase is brought to life with the wood steps and brick-effect wallpaper at the top – but it didn’t always look this way…
Before

Image credit: @diyingtoupcycle
When homeowner Hayley painted her staircase white, she didn’t dream she’d grow so fed up with it. And despite paying good money for the carpet just four years ago, she couldn’t wait to remove it.
‘I hated the carpet and it looked terrible after only a few months of having it,’ she says. ‘I’d wanted to take it up for so long, but my partner was having none of it. I tried to respect his decision, until one day I couldn’t take it anymore – and while he was sleeping on the sofa, I ripped it all up! It was a joyous occasion!’

Image credit: @diyingtoupcycle
Downstairs, the hall was painted in vibrant colours, but again, Hayley was keen to change it. ‘Some time ago I opted for some pretty bright paint – teal and pink and red – and it really wasn’t me. I don’t think I’d really settled into my own style at that point. It had to go!’
After

Image credit: @diyingtoupcycle
The new-look stairs certainly make an impact and Hayley has done a great job with all the painting. ‘The walls, all wooden trims, the front door and the radiator all needed painting,’ she says, ‘but this time I stuck to more muted tones. I chose white spindles and kept everything else black to match the black I used on the skirtings and door trims in the hallway.’
When it came to the stairs themselves, Hayley wanted to give them a rustic look and chose to sand and stain them. ‘The wood underneath, while in a total state, was gorgeous,’ she recalls. ‘I could see the grain was stunning and had so much potential. The work involved here was pretty crazy, though, and I can’t tell you how long I spent sanding them, but it was worth it. Plus, it only cost me two tins of varnish – and a new set of gel nails after!

Image credit: @diyingtoupcycle
Moving on to the landing and Hayley wasn’t lucky enough to find beautiful wooden floorboards underneath – instead she discovered it was OSB (Oriented Strand Board).
‘I figured out a few potential options, as I wanted to be as budget-friendly as possible,’ she says, ‘and finally decided to keep the OSB as my main floor. My plan was to sand it right back, apply the same stained varnish that was on the stairs and see how it looked. I ended up sitting on the floor for eight hours straight with a hand sander and the house was filthy from all the sanding by the end of it.’
After all the sanding, Hayley varnished the floor using the same product as she had on the stairs. ‘It came up so beautifully,’ she says. ‘It has such an industrial, earthy, rustic feel. I teamed it up with a couple of gorgeous jute rugs from Penneys and it was done.’

Image credit: @diyingtoupcycle
Downstairs, the walls were treated to a new colour scheme and plenty of plants. You can see what Hayley refers to as the ‘Pooch Pad’ – the under stairs dog house, which she painted using two coats of her leftover fence paint.

Image credit: @diyingtoupcycle
The brick-effect wallpaper has proved a real hit and Hayley couldn’t be happier with the results.
‘I wallpapered one wall on the landing and painted the others in an antique cream,’ she says. ‘Each door was painted an earthy browny/beige colour too, with a black frame. I added what feels like a million plants (mostly all real bar a couple of hanging faux ones), and a few mirrors that I upcycled and I was done!’
The post Fake an exposed brick wall with wallpaper – one savvy homeowner shows us how it's done appeared first on Ideal Home.
[ad_2]
www.idealhome.co.uk


