[ad_1]
It might sound impossible, but one mum and son duo transformed their downstairs loo for just £120! How? Using scraps from a charity bin in B&Q. And that’s not all – this cost-saving pair also reused supplies and bought from affordable retailers to keep costs down, giving the plain white room a total refresh.
Keen to introduce budget bathroom ideas to his small loo, Nick Richards from Harlow, Essex, had originally carried out a cheap bathroom makeover on a £50 budget. But along with his mum he was keen to issue a slightly bigger transformation.
‘With the original makeover we improved the plain white room by adding some hanging plants and picture frames on the wall,’ Nick told money-saving community LatestDeals.co.uk. ‘However this room has always lacked storage space and it was quite a cluttered area.’
Impressive budget bathroom makeover

Image credit: Nick Richards
Downstairs toilets are renowned for being small rooms that often get neglected, but Nick was determined to give this room a stylish scheme with smart storage.
‘My mum and I saw a photo of a really nice looking grey-and-white themed bathroom online and ever since we saw that image we both agreed that that was the sort of interior aesthetic we wanted to achieve for this makeover,’ says Nick.
‘The big plan was to get some kind of storage solution,’ he continues, ‘and we knew we wanted to box in the toilet and create a feature wall. We also had really bright blue turquoise tiles on the walls, which didn’t work with our overall colour scheme, so we had to figure out how to change them on a budget.’
Before

Image credit: Nick Richards
Having the bare toilet system on show was something that Nick and his mum wanted to change, in order to make the room look a bit smarter. ‘We decided to keep the wall colour, though, because we had a lot of that colour paint left over and we like the light grey on the wall,’ he says.
‘The first step was to remove the screws and nails from the walls which had been holding the shelves up. We got rid of the shelves because everything was on show, and there wasn’t anywhere to hide anything. Then we used Polyfilla on the holes left behind and painted over them, before starting on the main bulk of the makeover,’ explains Nick.

Image credit: Nick Richards
Luckily, the main decorating supplies, such as the paint, paintbrushes and roller were all supplies that Nick had left over from other projects. ‘I always recommend reusing your supplies where you can, to save money,’ he says.
To make the box to hide the toilet, Nick picked up a sheet of scrap MDF and a couple of lengths of wood from a B&Q store from one of their wood charity bins.
‘B&Q stores sometimes have charity bins of scrap wood where you give a donation to their charity and you can take whatever scrap wood you want,’ he says. ‘What a result! It’s a good tip for anyone who just needs the odd piece of wood and doesn’t want to spend a lot of money.’
Boxing in the toilet

Image credit: Nick Richards
Nick used the wood to make two L-shaped brackets, which he placed on either side of the toilet system to act as the main structure. ‘I screwed these to the wall, then used a sheet of MDF in front of the brackets,’ he says.
‘The main challenge was to make sure that the box we built around the toilet was easy to remove in case we had any problems with the plumbing within the toilet system.’
To cover the top of the toilet, Nick found an old scaffolding board in one of his neighbours’ skips that he cut down and placed onto the brackets.
‘We didn’t screw the shelf down as this ensured we could still have easy access to the toilet system,’ he says. ‘We covered the entire box and wall with the self adhesive tiles and job done!’
Painting the original wall tiles

Image credit: Nick Richards
Looking to disguise the blue wall tiles, Nick painted them white using some tile paint he picked up from Wilko for £15. Changing the colour meant the wall instantly felt fresher and more in keeping with the new design.
After: grey bathroom makeover

Image credit: Nick Richards
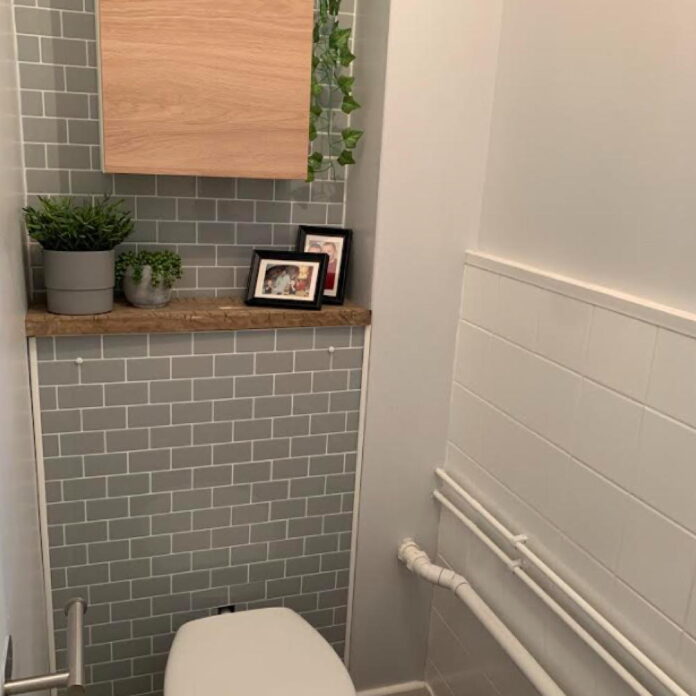
The finished result is a more streamlined loo that’s modern and sleek. ‘To make the tiled feature wall we bought two packs of self-adhesive subway tile sheets, in grey, from Amazon,’ says Nick.
‘These were £32 a pack. It sounds quite pricey, but compared to buying actual tiles, adhesive and grout, this method is so much cheaper. Plus it’s so much easier just to stick the tile sheets straight onto the wall.’

Image credit: Nick Richards
‘The rest of the supplies were mainly bought from IKEA,’ says Nick. ‘We bought a nice new bathroom cabinet, which was £30, and a big mirror, too. To save money on buying decorative pieces, we used some fake plants and family pictures in frames that we already had to make the bathroom a bit more homely.’
What do you think of Nick’s cheap bathroom makeover? Would you use tile stickers to save you time and money?
The post Charity hack led to this impressively cheap bathroom makeover costing just £120! appeared first on Ideal Home.
[ad_2]
www.idealhome.co.uk


