[ad_1]

Learn how to cut and connect drainpipe into a rack for a simple but challenging ball-toss lawn game.
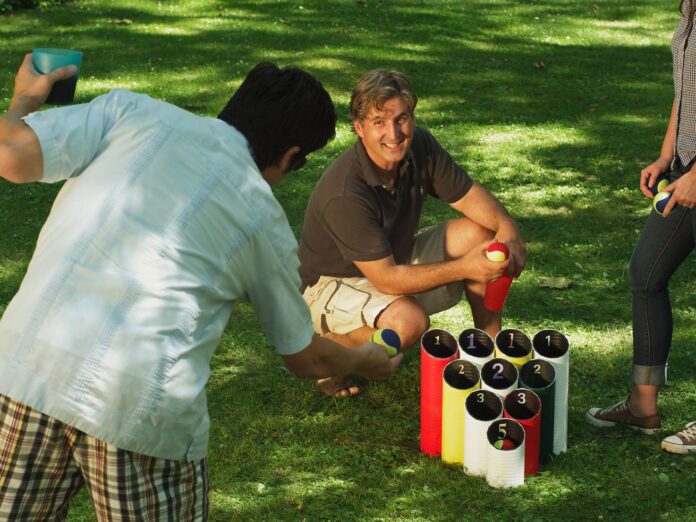
All those hours of playing Nerf hoops might finally add up to a useful skill when you bust out the pipe-ball game at your next garden party. Instead of shooting a foam basketball at a door-mounted hoop, though, you’re arcing a tennis ball at a grouping of pipes—and the rebound is nasty.
The angled ends and the varying heights of the pipes make it a game of skill that demands nothing less than the equivalent of a swish. Catch the unforgiving angled rim of one of the pipes and you’re off to the bushes to find where the ball bounced. But let’s be honest: The search won’t be any harder than rooting around for that Nerf basketball in your childhood room.
Build a Pipe Ball Game: An Overview
/cdn.vox-cdn.com/uploads/chorus_asset/file/23578130/pipe_ball_game_illustration.jpg)
Douglas Adams
To create a triangular rack of pipes whose openings angle toward the players, you’ll cut different lengths at a 30-degree angle and arrange them with the shortest one at the front. Because the width of the drainpipe is larger than many miter saws, you may need to fabricate a jig to guide your pull saw at the appropriate angle. And since the pipes aren’t made of PVC—and can’t be glued—you’ll need to drill holes where they meet and attach them to one other with plastic ties.
Once you’re finished, you can create a second rack and set up a playing field, or have everyone trade-off aiming at the same rack. Either way, it’s easy to spot the true pros. They’re the ones who score while holding a drink in one hand.
Keep scrolling for the shopping list and tools needed to complete this project.
Cut List
All dimensions are measured to the longest point of the tip angle
- Drainpipe: four at 14 inches
- Drainpipe: three at 11½ inches
- Drainpipe: two at 9 inches
- Drainpipe: one at 7 inches
- 1×5 jig base: one at 24 inches
- 1×6 jig wall: two at 24 inches, beveled 30 degrees at one end
Steps for Making a DIY Pipe Ball Lawn Game
/cdn.vox-cdn.com/uploads/chorus_asset/file/23592321/PipeBall2Up_1___TOH_06_10_10_036.jpg)
Wendell Webber
Step 1: Cut the jig pieces
First, cut the jig walls and base to length according to the cut list. With your circular saw set to 30 degrees and guided by a straightedge, bevel one end of each jig wall.
Step 2: Build the jig
- Lay the base flat, and sandwich it between the walls, set on edge with their bevels parallel. Use a straightedge to ensure the bevels are in line.
- At the nonbeveled end of the assembly, mark each of the walls flush with the butt of the base and cut them to length. This way, you can use one side of the jig for angled cuts, and the other side to guide straight cuts.
- Attach the pieces together by screwing through the sides and into the edges of the base.
/cdn.vox-cdn.com/uploads/chorus_asset/file/23592323/PipeBall2Up_4___TOH_06_10_10_075.jpg)
Wendell Webber
Step 3: Cut the angles
- Set the blade of the pull saw on the pipe, using the jig bevels as a guide.
- Cut through the pipe keeping the blade against the bevels through the entire cut.
Step 4: Mark a straight cut
- To mark your straight cut, measure from the peak of the angle.
- Use the opposite side of the jig to make the cut.
- Repeat steps 2 and 3 until all the pipes are cut to length.
/cdn.vox-cdn.com/uploads/chorus_asset/file/23592325/PipeBall2Up_6___TOH_06_10_10_118.jpg)
Wendell Webber
Step 5: Drill holes in the pipes
- Rack the pipes into a triangular shape on their angled ends, with the tallest row of four in back and the shortest one in front so that all the angles line up.
- On the bottom (straight—cut) edge of each pipe, mark where each pipe touches the adjoining pipes.
- One by one, remove a pipe from the grouping and transfer vertical lines onto the side of the pipe from the bottom marks.
- On each line, drill a ¼—inch hole at ½ inch and 4 inches from the bottom; you’ll run plastic ties through these holes to connect the pipes.
Step 6: Paint the pipes
Using a variety of spray paint colors, coat the exterior of each pipe with long, even strokes.
/cdn.vox-cdn.com/uploads/chorus_asset/file/23592326/PipeBall2Up_8___TOH_06_10_10_177.jpg)
Wendell Webber
Step 7: Attach the numbers
Attach number stickers to the inside of each pipe just below the peak to designate points: 1, 2, 3, and 5, going from the back row to the single pipe in front.
Step 8: Attach the Pipes
While all the pipes are positioned upside down on their angled ends, loop a plastic tie from the deeper 4-inch hole through the shallow ½-inch hole, secure it, and cut off the excess. Repeat until all the pipes are attached.
Materials
- 4-inch drainpipe (one 10-foot length per rack)
- 1×5 (get 6 feet)
- Stick-on numbers
- Plastic ties in 11-inch lengths
- Tennis balls (get two packs of three in different colors)
- Spray paint
Tools
[ad_2]
www.thisoldhouse.com


