
Replacing an ice maker line may seem like a daunting task, but with the right instructions, it can be done in just a few simple steps. While this is not something that should have to be done regularly, it is something that every homeowner should know how to do in case of an emergency.
In this article, we’ll show you how to install an ice maker line in just a few easy steps so that if the need arises, you’ll be prepared.
Let’s dive deep into this topic.
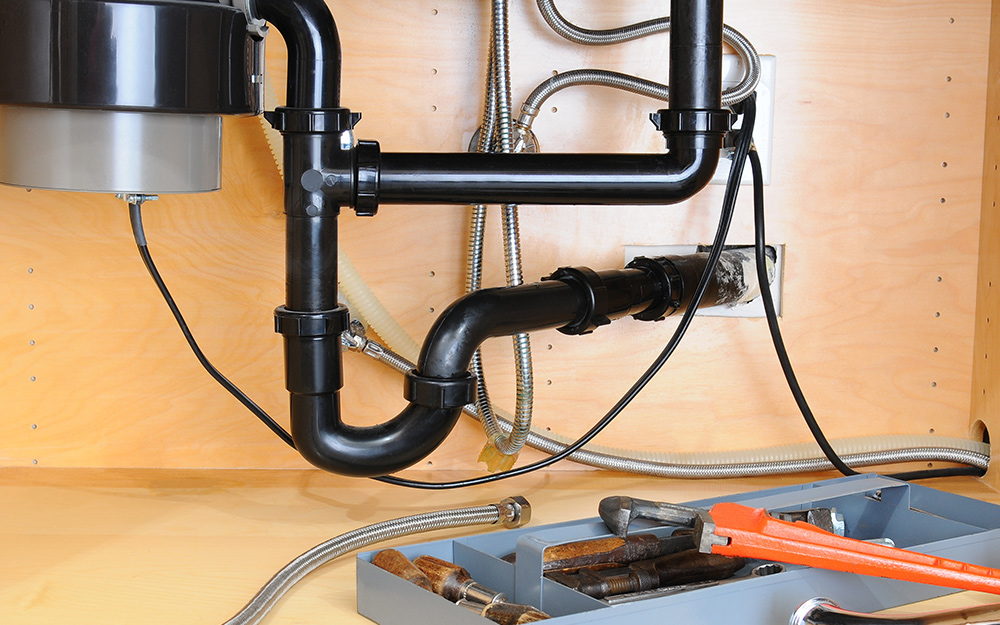
Image Credit: https://www.homedepot.com/
The Steps To Follow
The following are the steps you need to follow when installing an ice maker line.
1. Shut Off The Water Supply To The Refrigerator.
The first step is to shut off the water supply to the refrigerator. This can be done by shutting off the main water valve to the house or by shutting off the valve that leads to the refrigerator.
2. Unplug The Refrigerator.
The next step is to unplug the refrigerator from the wall outlet. This will ensure that no one accidentally turns it on while you are working on it.
3. Remove The Cover From The Back Of The Refrigerator.
Once the power is off, you can remove the cover from the back of the refrigerator. This will give you access to the water line that leads to the ice maker.
4. Locate The Water Line That Goes To The Ice Maker And Disconnect It.
The next step is to locate the water line that goes to the ice maker and disconnect it. This is usually a plastic or metal tubing that is connected to the back of the refrigerator.
5. Cut A Piece Of Copper Tubing That Is About 2 Feet Long.
Once the water line is disconnected, you will need to cut a piece of copper tubing that is about 2 feet long. This will be used to connect the ice maker to the waterline.
6. Strip 1/2 Inch Of Insulation Off Each End Of The Tubing.
After you have cut the tubing, you will need to strip 1/2 inch of insulation off each end of the tubing. This will expose the bare copper so that it can be connected to the fittings.
7. Slide A Compression Sleeve Over Each End Of The Tubing.
Next, you will need to slide a compression sleeve over each end of the tubing. This will secure the tubing to the fitting and prevent it from leaking.
8. Connect One End Of The Tubing To The Fitting On The Back Of The Refrigerator.
The next step is to connect one end of the tubing to the fitting on the back of the refrigerator. This is usually a plastic or metal fitting that is located near the waterline.
9. Connect The Other End Of The Tubing To The Ice Maker Line.
After you have connected the tubing to the back of the refrigerator, you will need to connect the other end of the tubing to the ice maker line. This is usually a plastic or metal tubing that is located near the ice maker.
10. Plug In The Refrigerator And Turn On The Water Supply.
The final step is to plug in the refrigerator and turn on the water supply. This will allow the ice maker to start making ice.
Now that you know how to install an ice maker line, you can be prepared in case of an emergency. Remember, this is not something that should be done regularly, but it is something that every homeowner should know how to do.
Fixing And Removing Your Ice Maker
Another situation that might arise is your ice maker might stop working or you might need to remove it.
If your ice maker has stopped working, the first thing you should do is check the water line to see if it is frozen. If the water line is frozen, you will need to thaw it out so that the ice maker can start working again.
Fixing your ice maker is usually a simple process, but if you are not comfortable doing it yourself, you can always call a professional.
On the other hand, if you need to remove your ice maker, the first thing you will need to do is shut off the water supply to the refrigerator. Next, you will need to disconnect the ice maker line from the back of the refrigerator. Once the line is disconnected, you can remove the ice maker from the refrigerator.
The process for installing and removing an ice maker is fairly simple, but it is always best to consult with a professional if you are not comfortable doing it yourself. This will ensure that the job is done correctly and that your ice maker is working properly.
Choosing A Great Ice Maker For Your Home
Knowing how to install an ice maker line is one thing, but choosing the right ice maker for your home is another. There are a few things you should consider when choosing an ice maker – once you have considered these factors, you can narrow down your choices and find the perfect ice maker for your home.
Size
The first thing you need to consider is the size of your family. If you have a large family, you will need an ice maker that can produce a lot of ice. However, if you have a small family, you can get by with a smaller ice maker.
For example, a countertop nugget ice maker is a good choice for a small family. This type of ice maker can produce up to 26 pounds of ice per day, which is enough for a family of four.
On the other hand, if you have a large family or entertain often, you will need an ice maker that can produce a lot of ice. A good choice for a large family is an under-counter ice maker. This type of ice maker can produce up to 50 pounds of ice per day, which is enough for a family of eight.
Type Of Ice
Another thing to consider when choosing an ice maker is the type of ice you prefer. The three most popular types of ice are flaked, cubed, and crushed.
Flaked ice is perfect for drinks because it melts quickly. Cubed ice is perfect for drinks and food because it doesn’t melt as quickly while crushed ice has a unique texture.
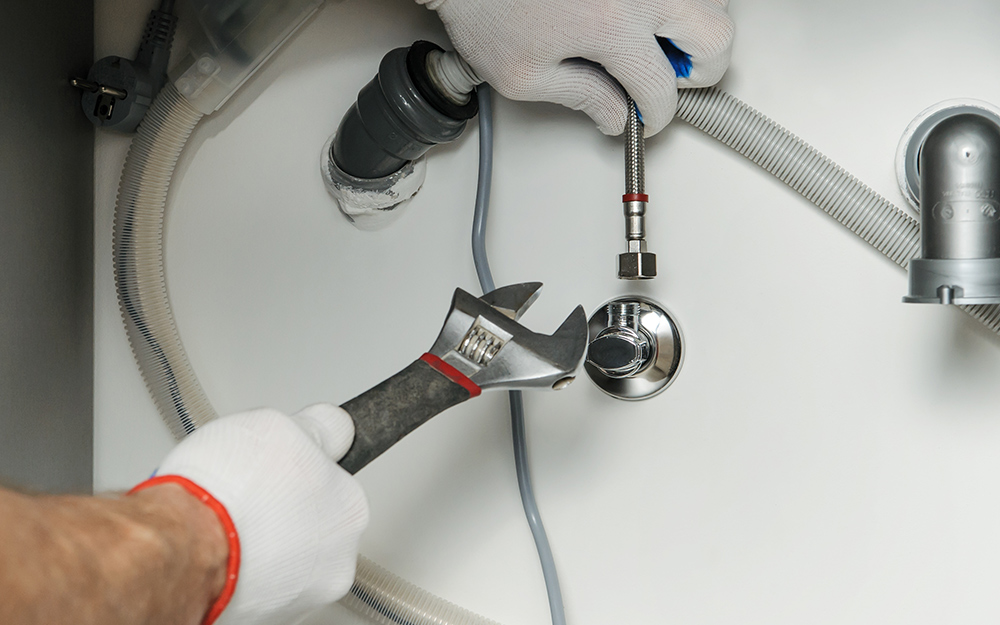
Image Credit: https://www.homedepot.com/
Final Thoughts On How To Install Ice Maker Line
In conclusion, we hope this guide helped teach you how to install an ice maker line. Being equipped with the right knowledge and tools will make the process much easier and less time-consuming.
The post How To Install Ice Maker Line appeared first on Kitchen Infinity.
kitcheninfinity.com


